


Welcome to Day 2 of our "365-Day Distributed Log Processing System Implementation" journey! Yesterday, we set up our development environment with Docker, Git, and VS Code. Today, we'll create our first active component: a log generator that produces sample logs at configurable rates.
What is a Log Generator and Why Do We Need One?
Imagine you're a detective investigating a crime scene. To solve the case, you need clues—lots of them! In the digital world, logs are these clues. They tell us what happened in our systems, when it happened, and sometimes why it happened.
A log generator is like a simulation machine that creates these digital clues on demand. Why build one? Because waiting for real events to occur to test our distributed log processing system would be like waiting for actual crimes to practice detective work—inefficient and unpredictable!
Real-World Connection
Think about how Netflix knows which shows to recommend to you. Their systems constantly log what you watch, when you pause, and even when you stop watching. These logs flow through distributed processing systems similar to what we're building. Companies like Spotify, Instagram, and Amazon use log processing to understand user behavior, detect system problems, and make intelligent recommendations.
Today's Goal
We'll build a configurable log generator that:
Produces timestamped log events
Allows adjusting the rate of log generation
Creates different types of log messages
Writes logs to files and the console
Step-by-Step Implementation
1. Create the Log Generator Structure
First, let's create a directory for our new service:
mkdir -p src/services/log-generator
cd src/services/log-generator
2. Create the Basic Files
Let's create the necessary files for our log generator:
touch app.py config.py log_generator.py Dockerfile requirements.txt3. Create a Configuration File
First, let's set up our configuration options in config.py:
https://github.com/sysdr/course/blob/main/day2/log-generator/src/services/log-generator/config.py
4. Create the Log Generator Class
Now, let's create our log_generator.py file:
5. Create the Main Application File
Now, let's create our app.py file:
https://github.com/sysdr/course/blob/main/day2/log-generator/src/services/log-generator/app.py
6. Create a Dockerfile
dockerfile
https://github.com/sysdr/course/blob/main/day2/log-generator/src/services/log-generator/Dockerfile
Run Your Log Generator
To run your new log generator:
docker-compose up --build
You should see logs being generated at the rate you specified!
Success Criteria
You've completed Day 2 successfully if:
✅ Your log generator produces logs at the configurable rate
✅ Logs include different message types based on distribution
✅ The logs appear in both the console and the specified file
✅ You can adjust the log rate by changing the environment variable
Distributed Systems Connection
How does this relate to distributed systems? In a real-world distributed system, logs come from many different sources—web servers, databases, mobile apps, IoT devices, and more. Our log generator simulates these various sources by creating different types of logs (INFO, WARNING, ERROR, DEBUG) at different rates.
As we build our distributed system, we'll use these generated logs to test our log processing pipeline's ability to handle varied input streams—just like Netflix processes millions of user interaction logs every second!
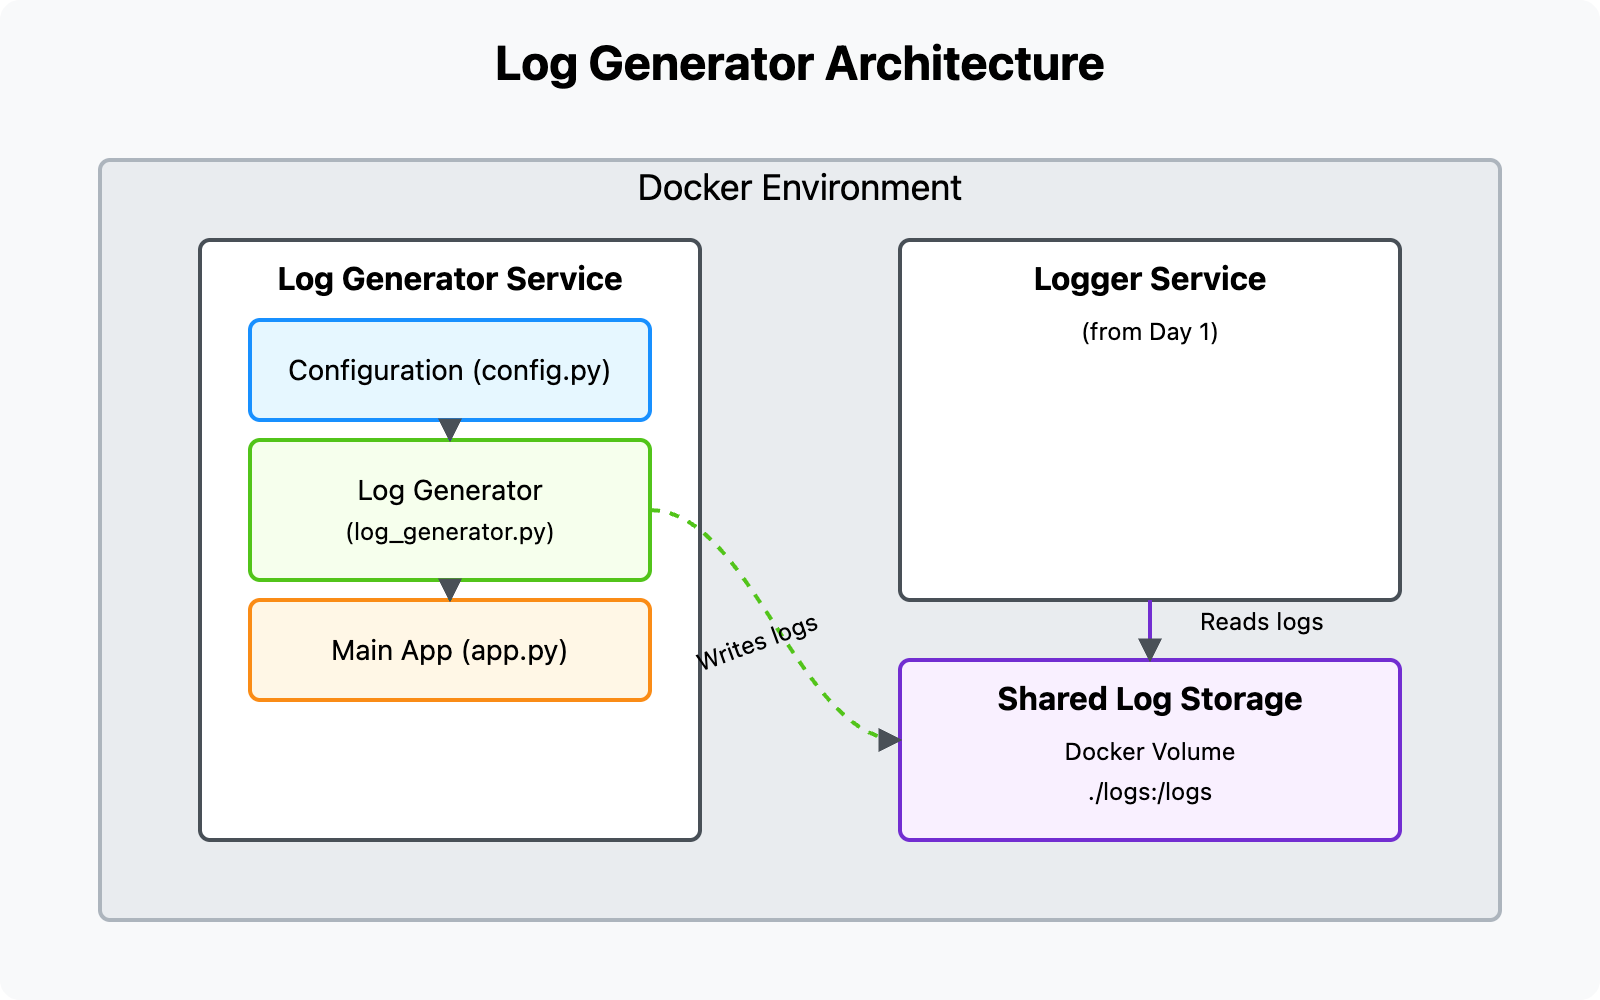
Log Generator Architecture
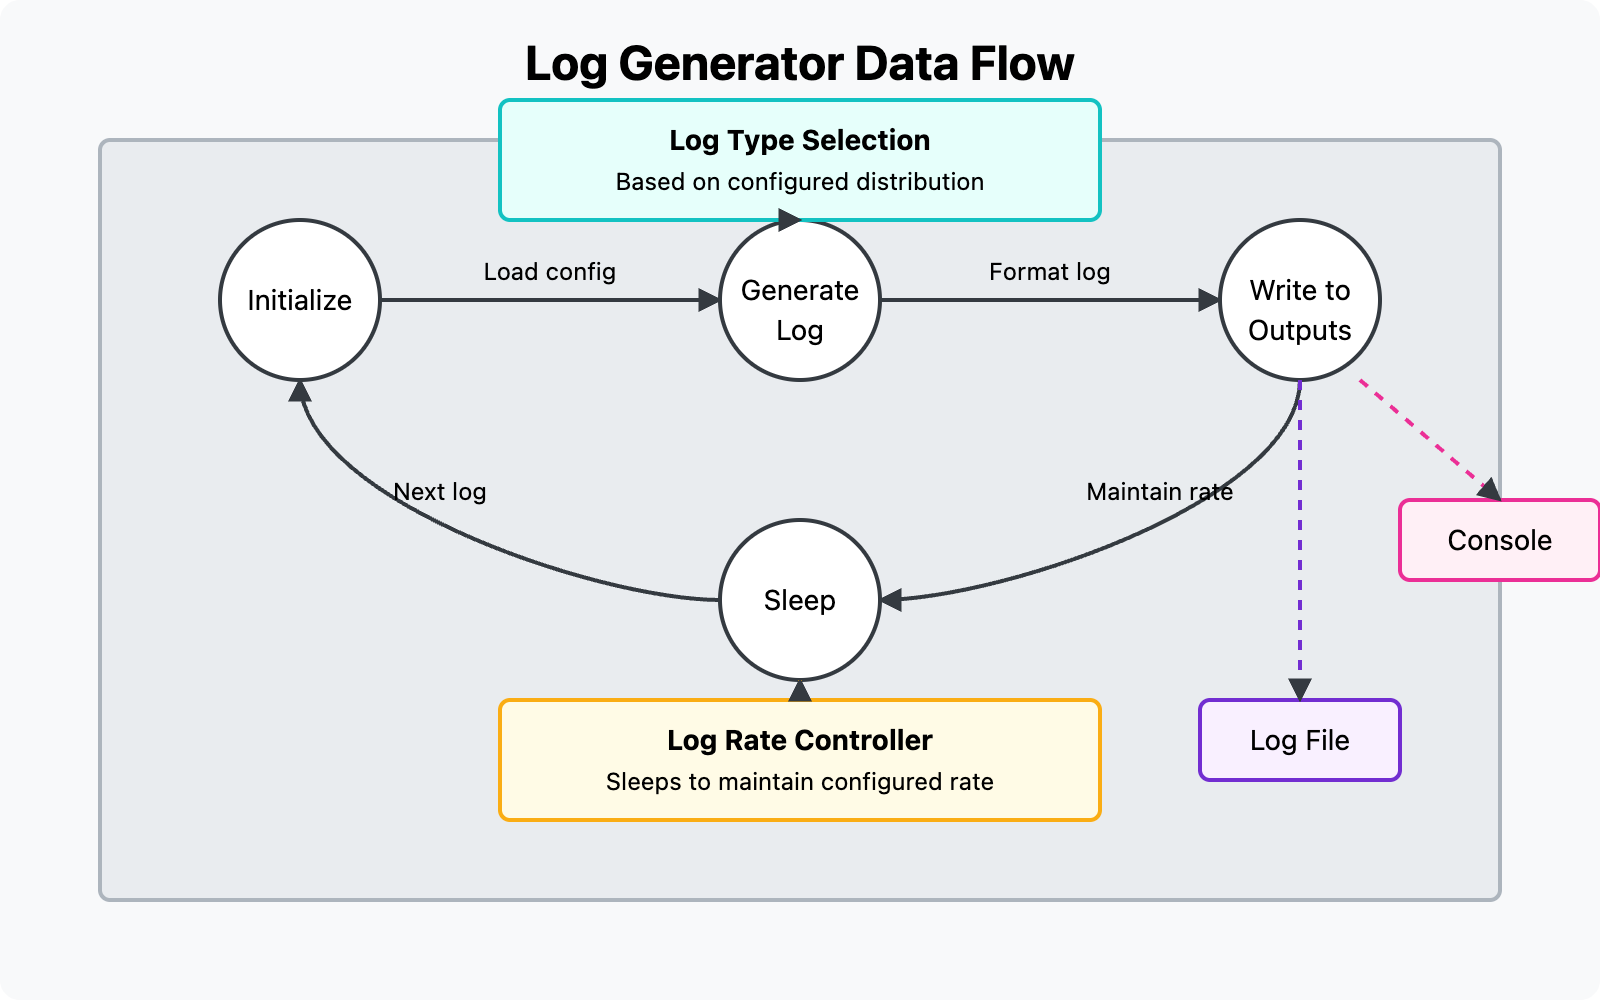
Log Generator Data Flow
Homework Assignment: Enhancing Your Log Generator
Now that you've built your basic log generator, let's enhance it with more features to make it even more powerful and configurable. This homework will help you better understand how log data can be structured and processed in distributed systems.
Your Tasks:
Add Custom Log Fields Modify your log generator to include additional fields in each log entry:
service_name: The name of the service generating the log (e.g., "user-service", "payment-service")user_id: A random user ID (e.g., "user-12345")request_id: A unique identifier for each requestduration: A random processing time in milliseconds
Implement Log Patterns Create realistic log patterns that simulate actual application behavior:
User session logs (login → browse → purchase → logout)
API request logs (request → processing → response)
Error sequences (warning → error → recovery)
Add Configuration for Log Format Enhance your config.py to allow selecting between different log formats:
JSON format
CSV format
Plain text format (default)
Create a Log Burst Mode Add a "burst mode" that occasionally generates a sudden spike of logs:
Implement a random trigger that occasionally increases log generation rate by 5-10x
Configure the burst duration (default: 3 seconds)
Make sure the burst frequency is configurable
Implementation Steps:
Update config.py to include new configuration options:
# Add to DEFAULT_CONFIG
"LOG_FORMAT": "text",  # Options: "text", "json", "csv"
"SERVICES": ["user-service", "payment-service", "inventory-service", "notification-service"],
"ENABLE_BURSTS": True,
"BURST_FREQUENCY": 0.05,  # 5% chance of burst per second
"BURST_MULTIPLIER": 5,    # 5x normal rate during burst
"BURST_DURATION": 3       # 3 seconds per burst
Enhance LogGenerator class to support these new features:
Add methods for generating the new fields
Implement the different log formats
Add the burst mode logic
Create Log Patterns by implementing a state machine that tracks user sessions or request flows
Test Your Implementation by running it with different configurations
4. Testing Steps
To test your log generator independently:
Build and run the container:
docker-compose -f docker-compose.yml up --buildYou should see log entries being generated at the configured rate (10 per second).
Check that logs are being written to the output file:
cat logs/generated_logs.logTry modifying the configuration by changing environment variables:
LOG_RATE=20 CONSOLE_OUTPUT=true docker-compose -f docker-compose.log-generator.yml up --buildThen run:
docker-compose up --build6. Verification Steps
Check Log Rate: Count how many logs are generated in a 10-second period. It should roughly match your configured LOG_RATE.
Check Log Types: Look at the log messages and verify that they follow your configured distribution (approximately 70% INFO, 20% WARNING, 5% ERROR, 5% DEBUG).
Verify Log Format: Confirm that each log entry has:
Timestamp
Log type
Unique ID
Message
Verify File Output: Open the log file and check that logs are being written correctly.
7. Troubleshooting
If logs aren't appearing in the console, check the CONSOLE_OUTPUT environment variable.
If logs aren't being written to a file, verify the OUTPUT_FILE path and ensure that the directory exists.
If the log rate seems off, check that the LOG_RATE value is being properly parsed from the environment variable.
Success Criteria:
✅ Your log generator produces logs with the new custom fields
✅ Logs can be output in different formats (JSON, CSV, plain text)
✅ The generator occasionally produces bursts of logs at higher rates
✅ Log patterns show realistic sequences of events
Bonus Challenge:
Create a simple log analyzer that reads the generated logs and produces some basic statistics:
Count of logs by type
Average duration by service
Detection of error sequences
Identification of unusual patterns
The analyzer should be able to handle all the log formats your generator produces.
Remember to update your Docker setup to include the new configuration options when you're ready to test!
Good luck with your implementation! In our next session, we'll expand our system to include a distributed log collector that can gather logs from multiple sources.
Background: The original post highlights creating a directory named src via the commands:
mkdir -p src/services/log-generator
cd src/services/log-generator
Challenge/Problem: Upon following all instructions and running docker-compose up --build, "it gives a unable to prepare context error"
Solution/Recommendation: Update Day 2 documentation to first create a root folder named "log-generator". The "src"folder has to be placed inside the "log-generator" folder
mkdir log-generator
cd log-generator
For this to work, you have to update the docker-compose.yaml file. If you just keep the one from lesson 1, it will just execute lesson 1's service. See the update to the docker-compose.yml file in the github repo.